
Thursday, 31 January 2013
Batman Chess Set - Black Mask & Manbat
Armoured Crab - all fixed now
Finally got round to pinning and reattaching the legs. But, for safety sake, think i'll have him sat on an old paint pot for most of the time.


Wednesday, 30 January 2013
Hornethopter - what to do?
Some more progress for you today. Here we have all six legs now on:
 Which raises the question - "How do i display it?" I couldn't have it landed even if i wanted to as those legs are FAR too spindly to support all that weight for 5 mins, let alone over a large amount of time. So its got to be in mid-air, which means a support rod - but where to put it? Usually it'd be best to put it on the underside, but there's just too much detail and its too darn narrow to put it there.
I think i'm meant to put it here, so i've drilled a hole ready:
Which raises the question - "How do i display it?" I couldn't have it landed even if i wanted to as those legs are FAR too spindly to support all that weight for 5 mins, let alone over a large amount of time. So its got to be in mid-air, which means a support rod - but where to put it? Usually it'd be best to put it on the underside, but there's just too much detail and its too darn narrow to put it there.
I think i'm meant to put it here, so i've drilled a hole ready:
 The problem i've got is: Usually i'd use a clear rod for the job as (A) it does a good job of suspending disbelief, (B) i really don't like flying models held up by an all-too apparrent bit of metal stuck out of it. But, if i use clear rod, it'd mean bending it through a 90 degree angle - and no plastic i use will hold that weight at that angle for a long amount of time. So i've no choice but use metal. Very opposed to it, but have thought of maybe a way i can disguise it. If i bend the metal shortly after it comes out the craft horizontaly, rather than vertically down to the ground, i could attach it to a building the craft could be flying past. So all i need is some brass rod and a Tamiya 1/35th WW2 building. Sorted. Another bit of progress is that i've assembled the antennae. It comes with these seperate brass etch pieces:
 Which i've glued together, but will not glue on 'till almost done, as they could ping off real easily:


Monday, 28 January 2013
Jabba's Throne Room - Ephant Mon & Gargan
So, thought it best to do two figures at a time, as that way it won't turn into a slog, and these are the first two:

 I've got Ephant Mon as my first choice, as he's always been one of my favourites at Jabba's court and i've always felt it a shame that he didn't get more screen-time. He's a strange, unique looking creature, well fitting in with such a supposed menacing lair of the vile gangster but he's shoved off to the sidelines in favour of more muppet-like creations, or humans with not much SF about them at all. No idea if that's because of the limitations of the suit/puppet or whatever it was used to animate him, but maybe.
His model equivilant is pretty darn accurate and pretty darn easy - just a grey for the skintones with a black wash, and various browns for his robes.
I've got Ephant Mon as my first choice, as he's always been one of my favourites at Jabba's court and i've always felt it a shame that he didn't get more screen-time. He's a strange, unique looking creature, well fitting in with such a supposed menacing lair of the vile gangster but he's shoved off to the sidelines in favour of more muppet-like creations, or humans with not much SF about them at all. No idea if that's because of the limitations of the suit/puppet or whatever it was used to animate him, but maybe.
His model equivilant is pretty darn accurate and pretty darn easy - just a grey for the skintones with a black wash, and various browns for his robes.

 Gargan is one of those humans with not much SF, but at least with her looks (and that strange, drunken goose-stepping dance she does) she again does fit in with that underworld that Jabba's meant to rule. In fact, if there was such a thing as a brothel on Tatooine, she'd be the madame. One thing i've never got about her is that she's six-breasted. Looking at the pic here, its pretty darn clear that she's only got one pair and then strips of cloth vaguely bra-like across her midriff. Either that or she does have six breasts, but all the size of fried eggs. Anyway, her plastic version is interesting in that the sculptor has copied the photo above exactly. The paintjob isn't exactly a challenge and i'm almost done - just some drybrushing of details left.


Plague Trolls - all finished


Sunday, 27 January 2013
Mangler Squigs
My son's Orc & Goblin army is gaining pace now, and he's nice and busy building and painting. I thought i'd help him out with the heavy duty side of things, so i've bought and will build these beasties. As usual with GW, the photo's don't really do the sculpts justice, in this case they look far, far too comedy:
 But i'd seen one built up in one of their shops and i was struck by how much better it looked in the flesh/resin and what a whopper it was. So got one yesterday, and here's what you get:
 Its Fine Cast, so that means tons of pour lugs all over. But they come off really easily and the part fit is excellent. I'd heard that the joins were pretty atrocious, especially between body and legs, and i knew that all of these models were withdrawn a while back for them to address the problem. They're back on the shelves now and i'm happy to say that everything fitted just fine. I used Araldite Rapid for gluing rather than the recommended superglue as a lot of the joins are pretty tiny. You're given a whole bunch of options for placing the Goblin crew, as well as mushrooms to place on the base and on the Squigs - apparantly Squigs are a sort of like a living fungus, found in caves. Anyway, here's what i did, then Primed in Grey, then White:
 Thoughts then turned to colour. I knew right off that they wouldn't be red as (A)everyone does them red (B) i hate painting red - especially the highlights, which always end up pink (C) my Son's army is the "Red Eyed Peas", with a uniform of red and black, plus his existing Squigs are all red. So that'd be an awful lot of red on the battlefield. So i'd go for something else then. But what? Green is out as there's plenty of that in his army. Blues and purples would look too cartoony. Greys and blacks would be dull. So i went yellow, choosing as the Basecoat Vallejo's "Flat Yellow"
I kept thinking of how they're fungus, so thought if i started with a yellow then add very earthy washes over that, i might get a natural, fungoid sort of appearance. So that's what i did, but i used two different colours for the washes - can't stand seeing a bunch of GW monsters together and all thier skins and all their clothes are all EXACTLY the same colours with EXACTLY the same weathering. So, one on the left has "Burnt Umber", one on the right has "Raw Umber":
Thoughts then turned to colour. I knew right off that they wouldn't be red as (A)everyone does them red (B) i hate painting red - especially the highlights, which always end up pink (C) my Son's army is the "Red Eyed Peas", with a uniform of red and black, plus his existing Squigs are all red. So that'd be an awful lot of red on the battlefield. So i'd go for something else then. But what? Green is out as there's plenty of that in his army. Blues and purples would look too cartoony. Greys and blacks would be dull. So i went yellow, choosing as the Basecoat Vallejo's "Flat Yellow"
I kept thinking of how they're fungus, so thought if i started with a yellow then add very earthy washes over that, i might get a natural, fungoid sort of appearance. So that's what i did, but i used two different colours for the washes - can't stand seeing a bunch of GW monsters together and all thier skins and all their clothes are all EXACTLY the same colours with EXACTLY the same weathering. So, one on the left has "Burnt Umber", one on the right has "Raw Umber":


Saturday, 26 January 2013
Martin Bower's now on Facebook

Friday, 25 January 2013
Jabba's Throne Room - the good, the bad, and the blummin' awful
Starting off then, i gave all the figures that were still in their brown plastic a coat of Grey Primer. That made them easier to see and to help choose who i'd use and who i'd not. The Good - this bunch:
 I'll be using all these, except Leia as Boussh as the scene i'll be depicting takes place long before she appears, but i thought i'd show her as its a pretty good sculpt. And i'll be using Oola too, despite her having the "long-limb syndrome" a lot of the figures have, as it doesn't look too bad on her.
In the Bad section we've got:
I'll be using all these, except Leia as Boussh as the scene i'll be depicting takes place long before she appears, but i thought i'd show her as its a pretty good sculpt. And i'll be using Oola too, despite her having the "long-limb syndrome" a lot of the figures have, as it doesn't look too bad on her.
In the Bad section we've got:
 Chewbacca's pretty darn good, but included here as he's jut too short compared to the humans. Luke's a good sculpt, but legs are a tad long. Boba Fett's hideous, what with his too large head and far too long legs. Han's a good sculpt but nearly as tall as Chewie. And C3P0 has got to be the lankiest Droid ever. And what's with that mouth? Awful can only be this:
 Rubbish, rubbish, rubbish. What were they thinking? No way is this going to be meeting one of my paint brushes.


Thursday, 24 January 2013
The Mark MK6 - blues
Really don't know why i'm showing this first pic. It's of the ship in its basecoat of Vallejo "Grey Blue", which is a lovely, deep moody blue - but the bright daylight on the day i took it washed it right out:
 Its much more apparent in the second one where i've done usual next stage - wash the whole thing with a very watery mix of the basecoat and black, sloshing it around and letting it dry off naturally:
 I've found that gives a nice, random look to the weathering. I've also added my trusted Go-Fasta stipes. Not for the identity bands i was talking of before, but as masking for them. I've found they're a much lower tac than masking tape and i've loads of them, so why not?
Last two pics are of where i am right now. The bands are on and for them i used Vallejo's "Pale Grey Blue" and, when dry, step 3 - break out the pastels, pastel, then seal with Matt Varnish:
I've found that gives a nice, random look to the weathering. I've also added my trusted Go-Fasta stipes. Not for the identity bands i was talking of before, but as masking for them. I've found they're a much lower tac than masking tape and i've loads of them, so why not?
Last two pics are of where i am right now. The bands are on and for them i used Vallejo's "Pale Grey Blue" and, when dry, step 3 - break out the pastels, pastel, then seal with Matt Varnish:


Wednesday, 23 January 2013
Jabba's Throne Room


From The Back Of The Cabinet - It Conquered The World


Sunday, 20 January 2013
Nurgle Lord


Friday, 18 January 2013
The Deadly Assassin
I've just watched the Doctor Who tale "The Deadly Assassin" for the first time since its transmission back in '76.
I remember two things about it from back then: (1) Not liking it because there were no spaceships or aliens in it, just a bunch of old Thesp's wandering round in dodgy makeup, (2) Being very disturbed by the Master in it. Not only by his hideous visage, but that it wasn't (and couldn't be) Roger Delgado.
Looking at it now, its a terrific story and that makeup is just as horrendous as i remember it. I mean, really, thats pushing it for a kids show now, let alone back then:
 Watching it now, its quite striking how elements in the tale would appear elsewhere later> Biggest of course being "The Matrix" - a cyber reality that a person can be put under and enter, a cut-down Mauser pistol as a blaster - coincedece surely as Han Solo's must've been made and filmed at the same time, and the make-up for the Master's rotten face had a sort of American cousin shortly after with "The Incredible Melting Man":


Thursday, 17 January 2013
Hornethopter - legs
Been a while since i've updated this as its been a bit of a slog to do all six legs, so i've found it best to do one at a time and come back to it.
Reason it being a slog is - hopefully you'll be able to make this out - that each leg comprises two parts (which needed Aralditing for extra strength,and that takes a while to set) and then two brass etch parts, the serrated shape at the end of the leg and the bracket in the middle that a cable will go through. Each one of those brackets had to be bent round to make the open box shape you see here and then glued in place with Superglue. That works okay - except the Superglue took ages to set on this type of resin. As i say, a slog. But, here we go with one side done and i'm getting all enthused - does look very bug-like now doesn't it?


Tuesday, 15 January 2013
Hellcannon - all done
Again another project unfairly pushed to one side when something new comes along, here it is done.
It went pretty well, and i'm happy with the additional Nurglins up top, the only tricky bit was what to do with the side and mouth of the barrel - how do you replicate souls turning around and around, whipped up into an energy that is then unleashed?
Decided to go with: drybrush White over the Grey Primer, wash with Dark Red, drybrush with White again, wash with Tamiya Clear Red, drybrush with White again, then a very watered down Clear Read over the top. Then lots of Gloss Varnish.


Monday, 14 January 2013
The Mark MK6 - Primed
So, here's the last of the details put on, and i've kept the donor parts to those from the bits box Mark kindly gave me.
 You'll see there's still lots of plain areas and that's because, right from the get-go, i've planned on having identifying colour bands in those places. Anyway, with them done, its Prime-Time and, hopefully, its pulled everything together:


Saturday, 12 January 2013
Plague Ogres - skin done
Had a real good time painting these fellas up - this is why i like Nurgle over anything else.
Here they are with their skinjobs done, plus you can see i've blocked in colours on other areas, just so i have a refernce point.
This one is my least favourite:
 Don't like his face, the mutation was a bit of a pain to do, and i i'm not a fan of the face on his belly plate.
This is my second:
Don't like his face, the mutation was a bit of a pain to do, and i i'm not a fan of the face on his belly plate.
This is my second:
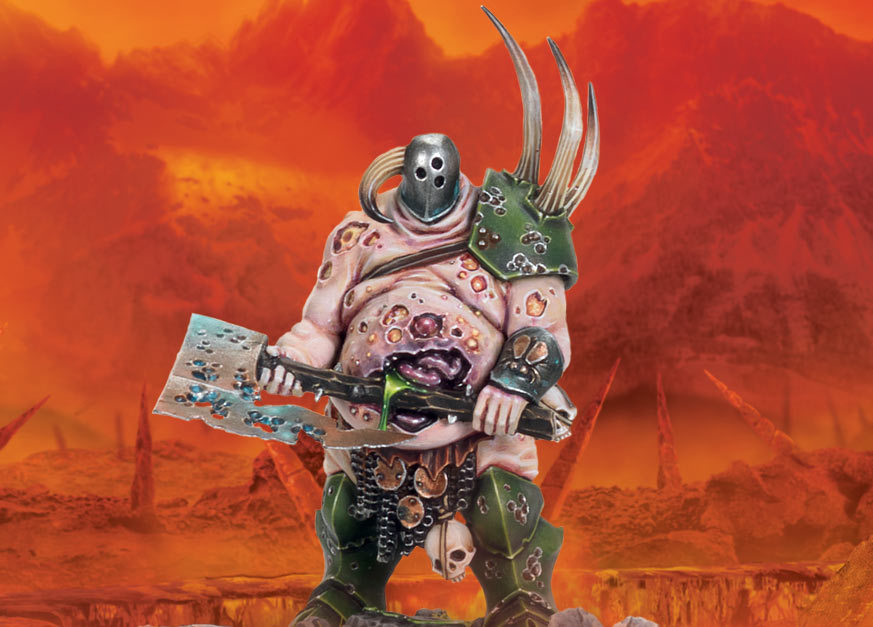
 Love his face, love the horns, love the open wounds and belly of pustles.
And this be my Number One guy:
Love his face, love the horns, love the open wounds and belly of pustles.
And this be my Number One guy:
 Not a fan of those back spines, but him holding his belly plate down, and all his insides coming with it, making it appear that he's serving them up on a plate, is just a fantastic idea.


Subscribe to:
Posts (Atom)

